Sky-takeout Day06
【前言】
Day06 的 Task :首先是初步了解 HttpClient 的作用,并通过一个简单入门案例了解应用场景;然后介绍微信小程序开发,做好准备工作后再通过案例了解微信小程序的实际开发流程;最后是动手开发微信登录功能并导入商品浏览功能。
Contents
HttpClient
微信小程序开发
微信登录
导入商品浏览功能代码
HttpClient
介绍:
HttpClient 是Apache Jakarta Common 下的子项目,可以用来提供高效的、最新的、功能丰富的支持 HTTP 协议的客户端编程工具包,并且它支持 HTTP 协议最新的版本和建议。
HttpClient作用:
- 发送HTTP请求
- 接收响应数据
HttpClient应用场景:
当我们在使用扫描支付、查看地图、获取验证码、查看天气等功能时,其实,应用程序本身并未实现这些功能,都是在应用程序里访问提供这些功能的服务,访问这些服务需要发送HTTP请求,并且接收响应数据,可通过HttpClient来实现。
HttpClient的maven坐标:
<dependency>
	<groupId>org.apache.httpcomponents</groupId>
	<artifactId>httpclient</artifactId>
	<version>4.5.13</version>
</dependency>- HttpClient的核心API:
- HttpClient:Http客户端对象类型,使用该类型对象可发起Http请求。
- HttpClients:可认为是构建器,可创建HttpClient对象。
- CloseableHttpClient:实现类,实现了HttpClient接口。
- HttpGet:Get方式请求类型。
- HttpPost:Post方式请求类型。
- HttpClient发送请求步骤:
- 创建HttpClient对象
- 创建Http请求对象
- 调用HttpClient的execute方法发送请求
- 入门案例
正常来说,首先,应该导入HttpClient相关的坐标,但在项目中,就算不导入,也可以使用相关的API。
因为在项目中已经引入了aliyun-sdk-oss坐标:
<dependency>
    <groupId>com.aliyun.oss</groupId>
    <artifactId>aliyun-sdk-oss</artifactId>
</dependency>
上述依赖的底层已经包含了HttpClient相关依赖。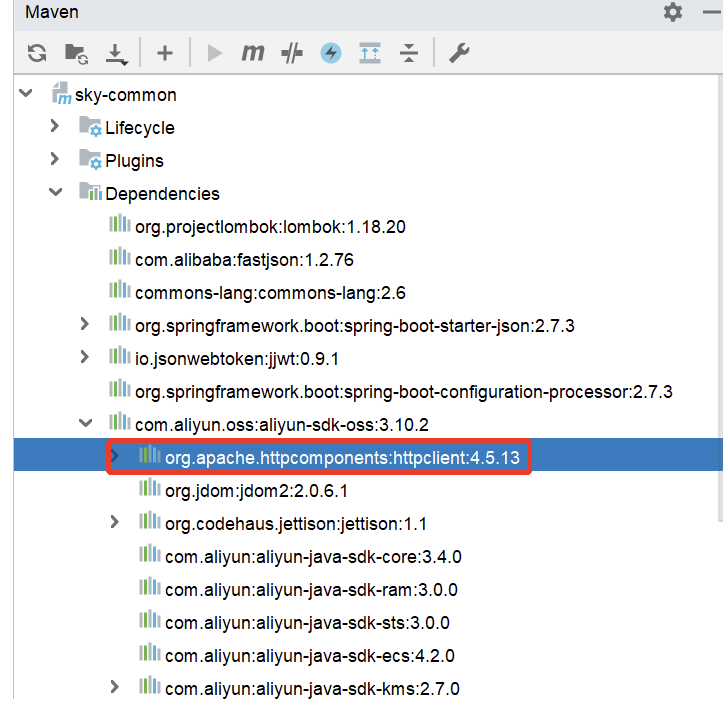
- GET方式请求
实现步骤:
- 创建HttpClient对象
- 创建请求对象
- 发送请求,接受响应结果
- 解析结果
- 关闭资源
package com.sky.test;

import org.apache.http.HttpEntity;
import org.apache.http.client.methods.CloseableHttpResponse;
import org.apache.http.client.methods.HttpGet;
import org.apache.http.impl.client.CloseableHttpClient;
import org.apache.http.impl.client.HttpClients;
import org.apache.http.util.EntityUtils;
import org.junit.jupiter.api.Test;
import org.springframework.boot.test.context.SpringBootTest;

@SpringBootTest
public class HttpClientTest {

    /**
     * 测试通过httpclient发送GET方式的请求
     */
    @Test
    public void testGET() throws Exception{
        //创建httpclient对象
        CloseableHttpClient httpClient = HttpClients.createDefault();

        //创建请求对象
        HttpGet httpGet = new HttpGet("http://localhost:8080/user/shop/status");

        //发送请求,接受响应结果
        CloseableHttpResponse response = httpClient.execute(httpGet);

        //获取服务端返回的状态码
        int statusCode = response.getStatusLine().getStatusCode();
        System.out.println("服务端返回的状态码为:" + statusCode);

        HttpEntity entity = response.getEntity();
        String body = EntityUtils.toString(entity);
        System.out.println("服务端返回的数据为:" + body);

        //关闭资源
        response.close();
        httpClient.close();
    }
}在访问http://localhost:8080/user/shop/status请求时,需要提前启动项目。
- POST方式请求
在HttpClientTest中添加POST方式请求方法,相比GET请求来说,POST请求若携带参数需要封装请求体对象,并将该对象设置在请求对象中。
实现步骤:
- 创建HttpClient对象
- 创建请求对象
- 发送请求,接收响应结果
- 解析响应结果
- 关闭资源
/**
    * 测试通过httpclient发送POST方式的请求
    */
   @Test
   public void testPOST() throws Exception{
       // 创建httpclient对象
       CloseableHttpClient httpClient = HttpClients.createDefault();

       //创建请求对象
       HttpPost httpPost = new HttpPost("http://localhost:8080/admin/employee/login");

       JSONObject jsonObject = new JSONObject();
       jsonObject.put("username","admin");
       jsonObject.put("password","123456");

       StringEntity entity = new StringEntity(jsonObject.toString());
       //指定请求编码方式
       entity.setContentEncoding("utf-8");
       //数据格式
       entity.setContentType("application/json");
       httpPost.setEntity(entity);

       //发送请求
       CloseableHttpResponse response = httpClient.execute(httpPost);

       //解析返回结果
       int statusCode = response.getStatusLine().getStatusCode();
       System.out.println("响应码为:" + statusCode);

       HttpEntity entity1 = response.getEntity();
       String body = EntityUtils.toString(entity1);
       System.out.println("响应数据为:" + body);

       //关闭资源
       response.close();
       httpClient.close();
   }
微信小程序开发
具体介绍和注册小程序等准备工作这里就不放了,具体可以看课程或者讲义来大致了解一下,下面只讲一下小程序的结构。
实际上,小程序的开发本质上属于前端开发,主要使用JavaScript开发
小程序目录结构:
小程序包含一个描述整体程序的 app 和多个描述各自页面的 page。一个小程序主体部分由三个文件组成,必须放在项目的根目录,如下: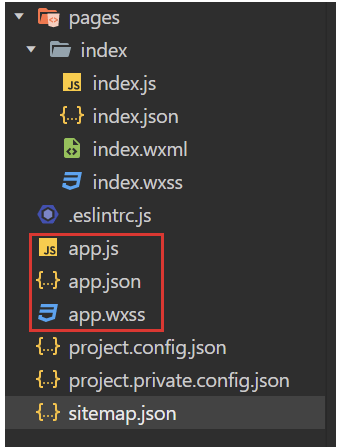
文件说明: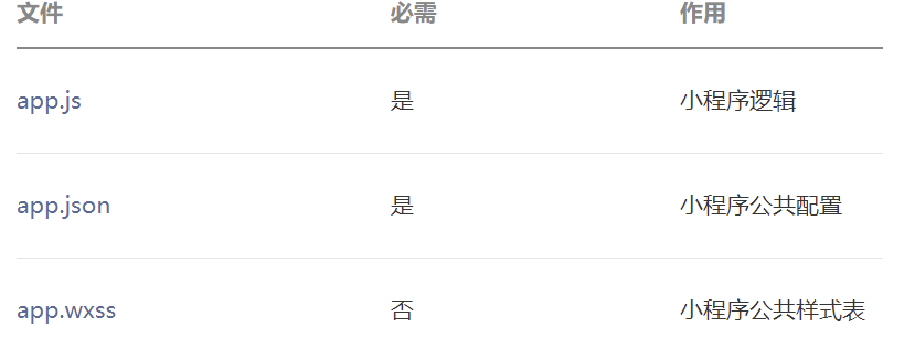
**app.js:**必须存在,主要存放小程序的逻辑代码
**app.json:**必须存在,小程序配置文件,主要存放小程序的公共配置
app.wxss: 非必须存在,主要存放小程序公共样式表,类似于前端的CSS样式
对小程序主体三个文件了解后,其实一个小程序又有多个页面。比如说,有商品浏览页面、购物车的页面、订单支付的页面、商品的详情页面等等。那这些页面会放在哪呢?
小程序页面:
会存放在pages目录,每个小程序页面主要由四个文件组成: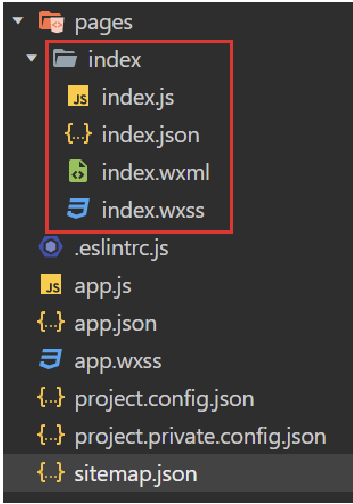
文件说明: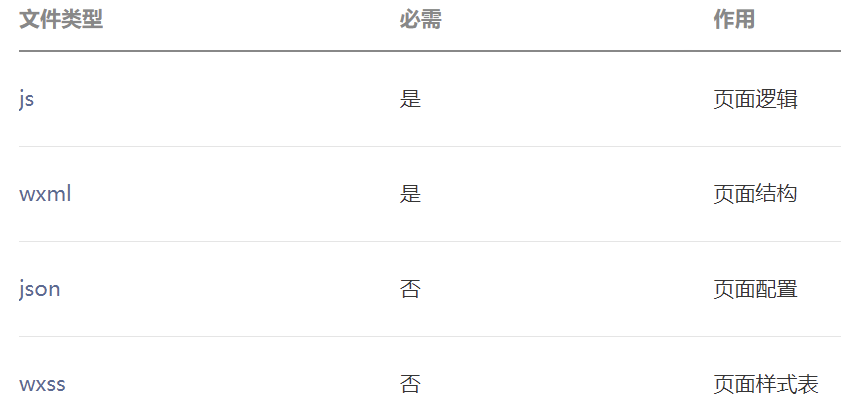
**js文件:**必须存在,存放页面业务逻辑代码,编写的js代码。
**wxml文件:**必须存在,存放页面结构,主要是做页面布局,页面效果展示的11,类似于HTML页面。
**json文件:**非必须,存放页面相关的配置。
**wxss文件:**非必须,存放页面样式表,相当于CSS文件。
微信登录
分析与设计
原型分析:
用户进入到小程序的时候,微信授权登录之后才能点餐。需要获取当前微信用户的相关信息,比如昵称、头像等,这样才能够进入到小程序进行下单操作。是基于微信登录来实现小程序的登录功能,没有采用传统账户密码登录的方式。若第一次使用小程序来点餐,就是一个新用户,需要把这个新的用户保存到数据库当中完成自动注册。
业务规则:
- 基于微信登录实现小程序的登录功能
- 如果是新用户需要自动完成注册
接口设计:
通过微信登录的流程,如果要完成微信登录的话,最终就要获得微信用户的openid。在小程序端获取授权码后,向后端服务发送请求,并携带授权码,这样后端服务在收到授权码后,就可以去请求微信接口服务。最终,后端向小程序返回openid和token等数据。
基于上述的登录流程,就可以设计出该接口的请求参数和返回数据。
**说明:**请求路径/user/user/login,第一个user代表用户端,第二个user代表用户模块。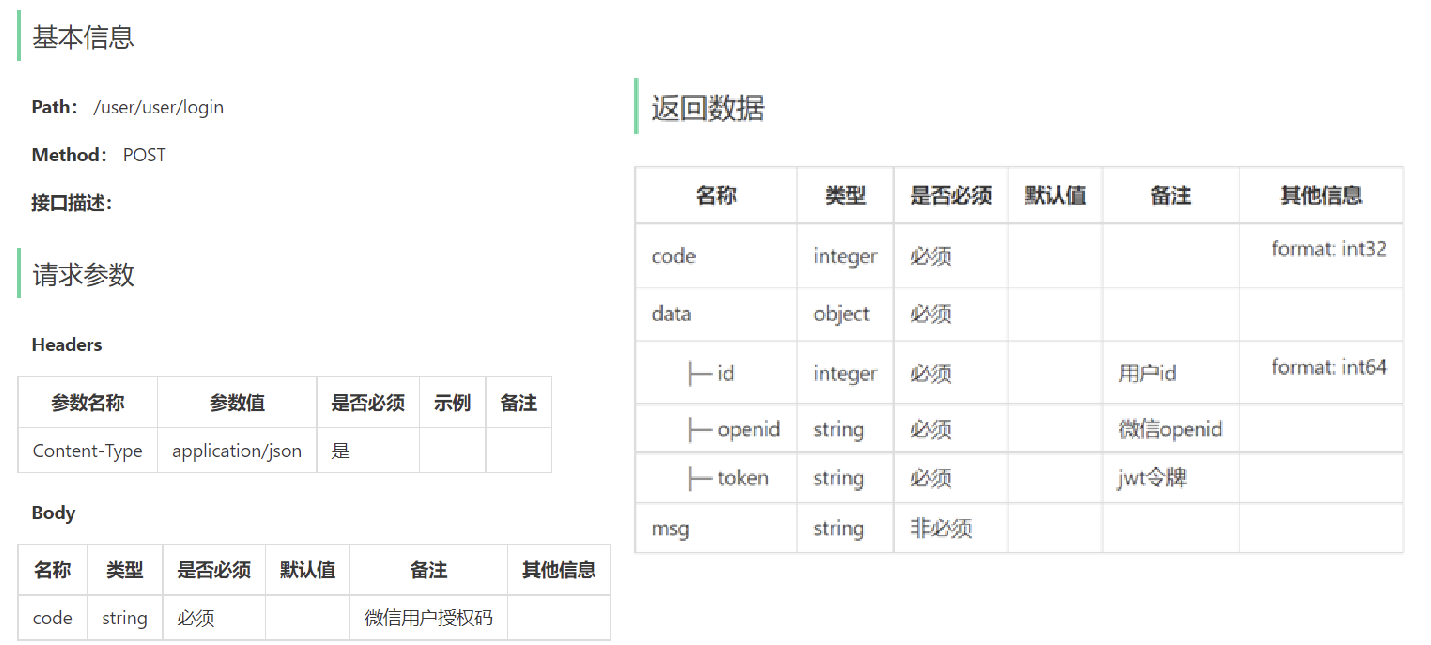
表设计:
当用户第一次使用小程序时,会完成自动注册,把用户信息存储到user表中。
| 字段名 | 数据类型 | 说明 | 备注 |
|---|---|---|---|
| id | bigint | 主键 | 自增 |
| openid | varchar(45) | 微信用户的唯一标识 | |
| name | varchar(32) | 用户姓名 | |
| phone | varchar(11) | 手机号 | |
| sex | varchar(2) | 性别 | |
| id_number | varchar(18) | 身份证号 | |
| avatar | varchar(500) | 微信用户头像路径 | |
| create_time | datetime | 注册时间 |
**说明:**手机号字段比较特殊,个人身份注册的小程序没有权限获取到微信用户的手机号。如果是以企业的资质
注册的小程序就能够拿到微信用户的手机号。
代码编写
定义相关配置
配置微信登录所需配置项:
application-dev.yml
sky:
  wechat:
    appid: *****(你注册的appid)
    secret: *****(你注册的密钥)
application.yml
sky:
  wechat:
    appid: ${sky.wechat.appid}
    secret: ${sky.wechat.secret}
配置为微信用户生成jwt令牌时使用的配置项:
application.yml
sky:
  jwt:
    # 设置jwt签名加密时使用的秘钥
    admin-secret-key: itcast
    # 设置jwt过期时间
    admin-ttl: 7200000
    # 设置前端传递过来的令牌名称
    admin-token-name: token
    user-secret-key: itheima
    user-ttl: 7200000
    user-token-name: authentication
DTO、VO以及三层架构
根据传入参数设计DTO类: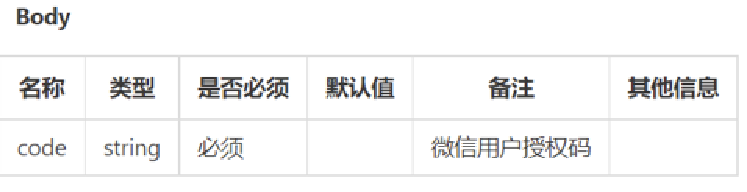
在sky-pojo模块,UserLoginDTO.java已定义
package com.sky.dto;

import lombok.Data;

import java.io.Serializable;

/**
 * C端用户登录
 */
@Data
public class UserLoginDTO implements Serializable {

    private String code;

}
根据返回数据设计VO类: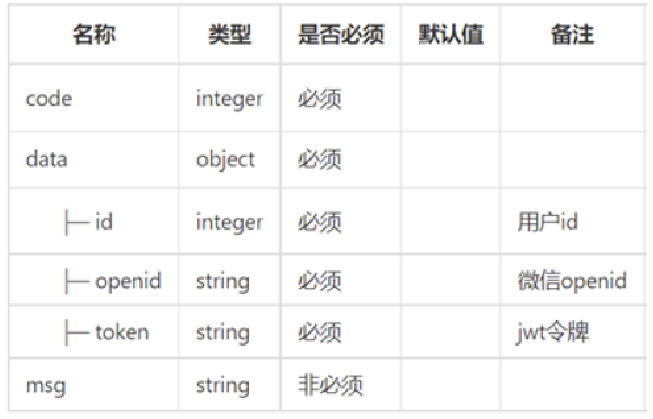
在sky-pojo模块,UserLoginVO.java已定义
package com.sky.vo;

import lombok.AllArgsConstructor;
import lombok.Builder;
import lombok.Data;
import lombok.NoArgsConstructor;

import java.io.Serializable;

@Data
@Builder
@NoArgsConstructor
@AllArgsConstructor
public class UserLoginVO implements Serializable {

    private Long id;
    private String openid;
    private String token;

}UserController.java:实现 装配 JWT 令牌和 openid 和用户id 返回给前端
package com.sky.controller.user;

import com.sky.constant.JwtClaimsConstant;
import com.sky.dto.UserLoginDTO;
import com.sky.entity.User;
import com.sky.properties.JwtProperties;
import com.sky.result.Result;
import com.sky.service.UserService;
import com.sky.utils.JwtUtil;
import com.sky.vo.UserLoginVO;
import io.swagger.annotations.Api;
import io.swagger.annotations.ApiOperation;
import lombok.extern.slf4j.Slf4j;
import org.springframework.beans.factory.annotation.Autowired;
import org.springframework.web.bind.annotation.PostMapping;
import org.springframework.web.bind.annotation.RequestBody;
import org.springframework.web.bind.annotation.RequestMapping;
import org.springframework.web.bind.annotation.RestController;

import java.util.HashMap;
import java.util.Map;

@RestController
@Slf4j
@RequestMapping("/user/user")
@Api(tags = "C端用户相关接口")
public class UserController {

    @Autowired
    private UserService userService;
    @Autowired
    private JwtProperties jwtProperties;

    @PostMapping("/login")
    @ApiOperation("用户微信登录")
    public Result<UserLoginVO> login(@RequestBody UserLoginDTO userLoginDTO) {
        log.info("用户微信登录:{}", userLoginDTO.getCode());

        User user = userService.wxlogin(userLoginDTO);

        // 上面 user 从数据库中获得了 用于微信登录的 openid 和用户主键 id
        // 下面再创建一个 Jwt 令牌,然后封装成 UserLoginVO返回给前端
        Map<String, Object> claims = new HashMap<>();
        // 这里能获取id,因为再数据库层用了useGeneratedKeys, 并将id绑定再实体类的id属性
        claims.put(JwtClaimsConstant.USER_ID, user.getId());
        String token = JwtUtil.createJWT(jwtProperties.getUserSecretKey(), jwtProperties.getUserTtl(), claims);
        UserLoginVO userLoginVO = UserLoginVO.builder()
                                            .id(user.getId())
                                            .openid(user.getOpenid())
                                            .token(token)
                                            .build();

        return Result.success(userLoginVO);  // 将封装好的VO返回
    }

}
UserServiceImpl.java : 实现获取微信用户的openid和微信登录功能,若是新用户直接注册
package com.sky.service.impl;

import com.alibaba.fastjson.JSON;
import com.alibaba.fastjson.JSONObject;
import com.sky.constant.MessageConstant;
import com.sky.dto.UserLoginDTO;
import com.sky.entity.User;
import com.sky.exception.LoginFailedException;
import com.sky.mapper.UserMapper;
import com.sky.properties.WeChatProperties;
import com.sky.service.UserService;
import com.sky.utils.HttpClientUtil;
import lombok.extern.slf4j.Slf4j;
import org.springframework.beans.factory.annotation.Autowired;
import org.springframework.stereotype.Service;

import java.time.LocalDateTime;
import java.util.HashMap;
import java.util.Map;

@Service
@Slf4j
public class UserServiceImpl implements UserService {

    // 微信接口服务地址
    private static final String WX_LOGIN = "https://api.weixin.qq.com/sns/jscode2session";

    @Autowired
    private UserMapper userMapper;
    @Autowired
    private WeChatProperties weChatProperties;

    /**
     * 用户微信登录
     * @param userLoginDTO 用户登录信息
     * @return 用户信息
     */
    @Override
    public User wxlogin(UserLoginDTO userLoginDTO) {
        // 根据微信授权码 code (在入参DTO传来的)获取用户唯一标识 openid
        String openid = getOpenid(userLoginDTO.getCode());
        // openid为空则抛出业务异常
        if(openid == null) {
            throw new LoginFailedException(MessageConstant.LOGIN_FAILED);
        }

        User user = userMapper.getByOpenid(openid);
        // 判断用户信息是否存在数据库中,不存在说明是新用户,则进行注册 即插入用户信息
        if(user == null) {
            // 先将用户信息填充好,然后插入数据库
            user = User.builder()
                    .openid(openid)
                    .createTime(LocalDateTime.now())
                    .build();
            userMapper.insert(user);
        }
        return user; // 返回用户信息
    }

    /**
     * 调用微信接口服务,获取用户的openid
     * @param code 用户登录信息中的微信授权码
     * @return openid 字符串
     */
    // 利用 httpclient 工具类向微信接口服务发起请求,以获取用户唯一标识 openid
    private String getOpenid(String code) {
        Map<String, String> map = new HashMap<>();
        map.put("appid", weChatProperties.getAppid());
        map.put("secret", weChatProperties.getSecret());
        map.put("js_code", code);
        map.put("grant_type", "authorization_code");
        String json = HttpClientUtil.doGet(WX_LOGIN, map);
        JSONObject jsonObject = JSON.parseObject(json);

        return jsonObject.getString("openid"); // 将微信接口服务返回的json中的openid值返回
    }
}
UserMapper.java:根据openid查询用户是否存在以及实现插入,用于 Service 层判断该用户是否要注册,新用户就往表插入数据代表注册
package com.sky.mapper;

import com.sky.entity.User;
import org.apache.ibatis.annotations.Mapper;
import org.apache.ibatis.annotations.Select;

@Mapper
public interface UserMapper {
    /**
     * 根据 openid 查询用户信息, 存在即可登录,不存在则要注册,后续 insert 用户信息
     * @param openid 微信用户唯一标识 openid
     * @return 用户信息
     */
    @Select("select * from user where openid = #{openid};")
    User getByOpenid(String openid);

    /**
     * 插入用户信息, 即新用户进行注册操作
     * @param user 用户信息
     */
    void insert(User user);
}
UserMapper.xml
<?xml version="1.0" encoding="UTF-8" ?>
<!DOCTYPE mapper PUBLIC "-//mybatis.org//DTD Mapper 3.0//EN"
        "http://mybatis.org/dtd/mybatis-3-mapper.dtd" >
<mapper namespace="com.sky.mapper.UserMapper">

    <insert id="insert" useGeneratedKeys="true" keyProperty="id">
        insert into user (openid, name, phone, sex, id_number, avatar, create_time)
        values
        (#{openid}, #{name}, #{phone}, #{sex}, #{idNumber}, #{avatar}, #{createTime})
    </insert>
</mapper>
配置拦截器
**编写拦截器JwtTokenUserInterceptor:**统一拦截用户端发送的请求并进行jwt校验
package com.sky.interceptor;

import com.sky.constant.JwtClaimsConstant;
import com.sky.context.BaseContext;
import com.sky.properties.JwtProperties;
import com.sky.utils.JwtUtil;
import io.jsonwebtoken.Claims;
import lombok.extern.slf4j.Slf4j;
import org.springframework.beans.factory.annotation.Autowired;
import org.springframework.messaging.handler.HandlerMethod;
import org.springframework.stereotype.Component;
import org.springframework.web.servlet.HandlerInterceptor;

import javax.servlet.http.HttpServletRequest;
import javax.servlet.http.HttpServletResponse;

/**
 * 用户端JWT令牌拦截器
 */
@Component
@Slf4j
public class JwtTokenUserInterceptor implements HandlerInterceptor {

    @Autowired
    private JwtProperties jwtProperties;

    /**
     * 校验jwt, 在目标方法执行之前执行
     * @param request 请求对象
     * @param response 响应对象
     * @param handler 处理器(controller方法)
     * @return true:放行,继续执行后续操作;false:拦截,不继续执行后续操作
     * @throws Exception 异常
     */
    public boolean preHandle(HttpServletRequest request, HttpServletResponse response, Object handler) throws Exception {
        //判断当前拦截到的是Controller的方法还是其他资源
        if (!(handler instanceof HandlerMethod)) {
            //当前拦截到的不是动态方法,直接放行
            return true;
        }

        //1、从请求头中获取令牌
        String token = request.getHeader(jwtProperties.getUserTokenName());

        //2、校验令牌
        try {
            log.info("jwt校验:{}", token);
            Claims claims = JwtUtil.parseJWT(jwtProperties.getUserSecretKey(), token);
            Long userId = Long.valueOf(claims.get(JwtClaimsConstant.USER_ID).toString());
            log.info("当前用户的id:{}", userId);
            BaseContext.setCurrentId(userId);
            //3、通过,放行
            return true;
        } catch (Exception ex) {
            //4、不通过,响应 401 状态码
            response.setStatus(401);
            return false;
        }
    }
}
在WebMvcConfiguration配置类中注册拦截器:
@Autowired
    private JwtTokenUserInterceptor jwtTokenUserInterceptor;
	/**
     * 注册自定义拦截器
     * @param registry
     */
    protected void addInterceptors(InterceptorRegistry registry) {
        log.info("开始注册自定义拦截器...");
        //.........

        registry.addInterceptor(jwtTokenUserInterceptor)
                .addPathPatterns("/user/**")
                .excludePathPatterns("/user/user/login")
                .excludePathPatterns("/user/shop/status");
    }
功能测试
微信发送授权码 code 给服务端 Controller
Service中根据 code 获取 openid 并判断是否需要注册新用户
导入商品浏览功能代码
分析与设计
根据原型图先粗粒度设计接口,共包含4个接口。
接口设计:
- 查询分类
- 根据分类id查询菜品
- 根据分类id查询套餐
- 根据套餐id查询包含的菜品
接下来细粒度分析每个接口,明确每个接口的请求方式、请求路径、传入参数和返回值。
1). 查询分类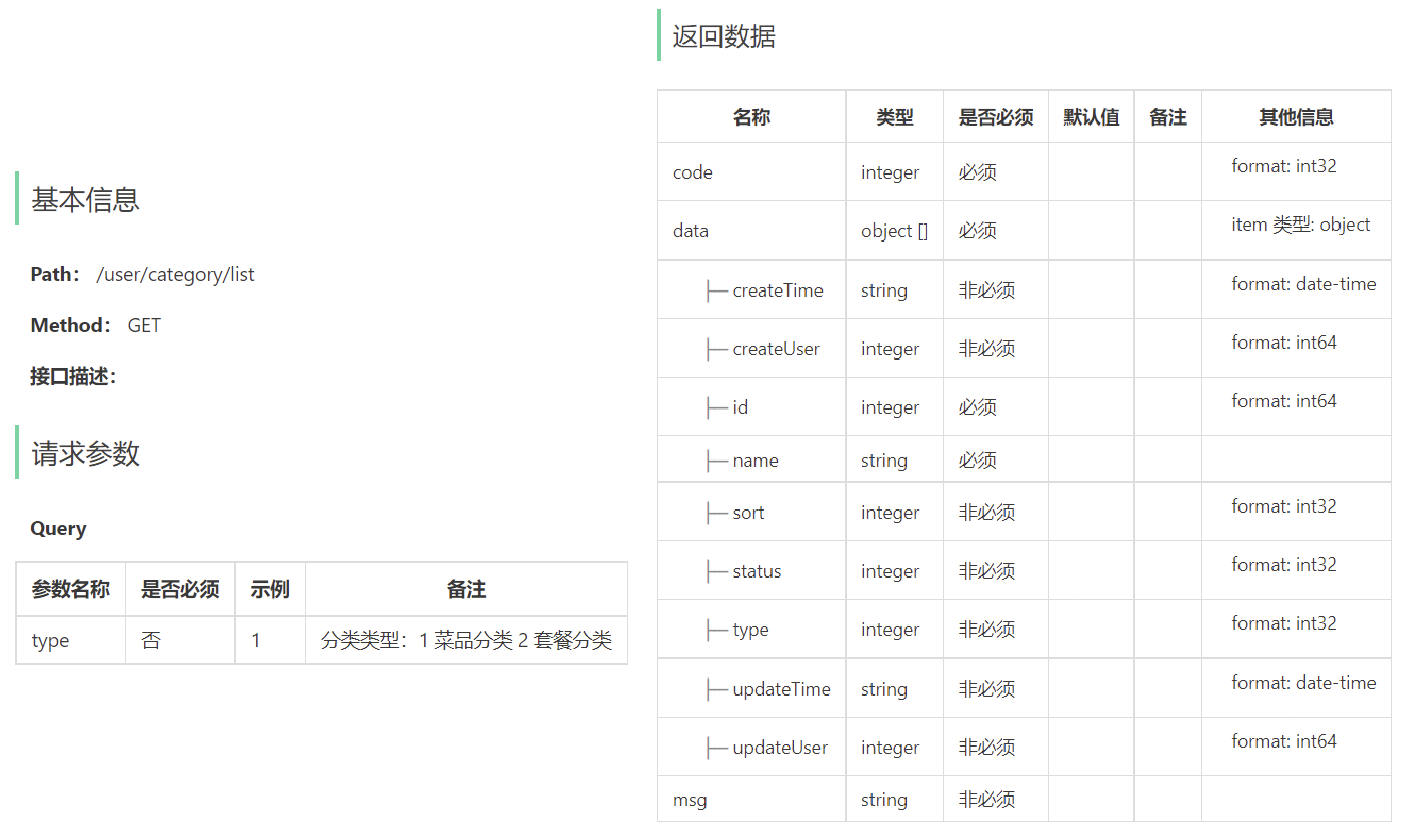
2). 根据分类id查询菜品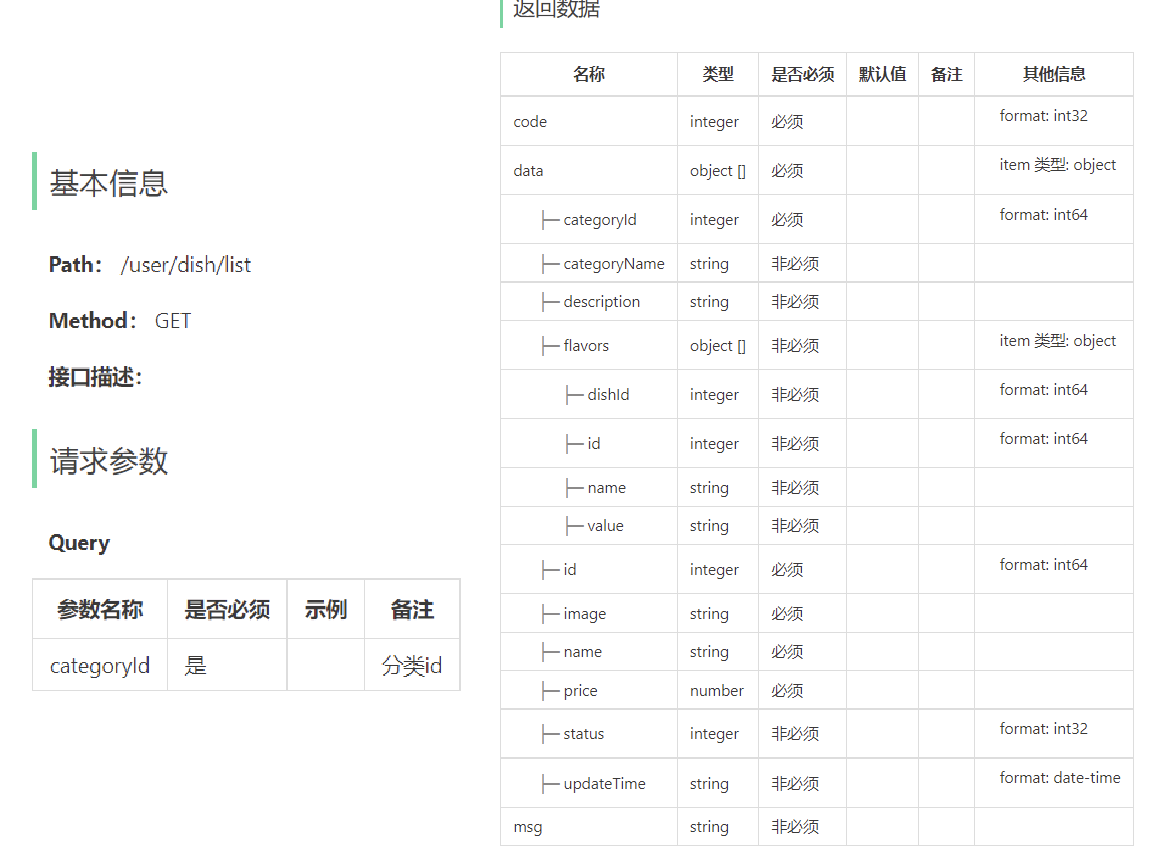
3). 根据分类id查询套餐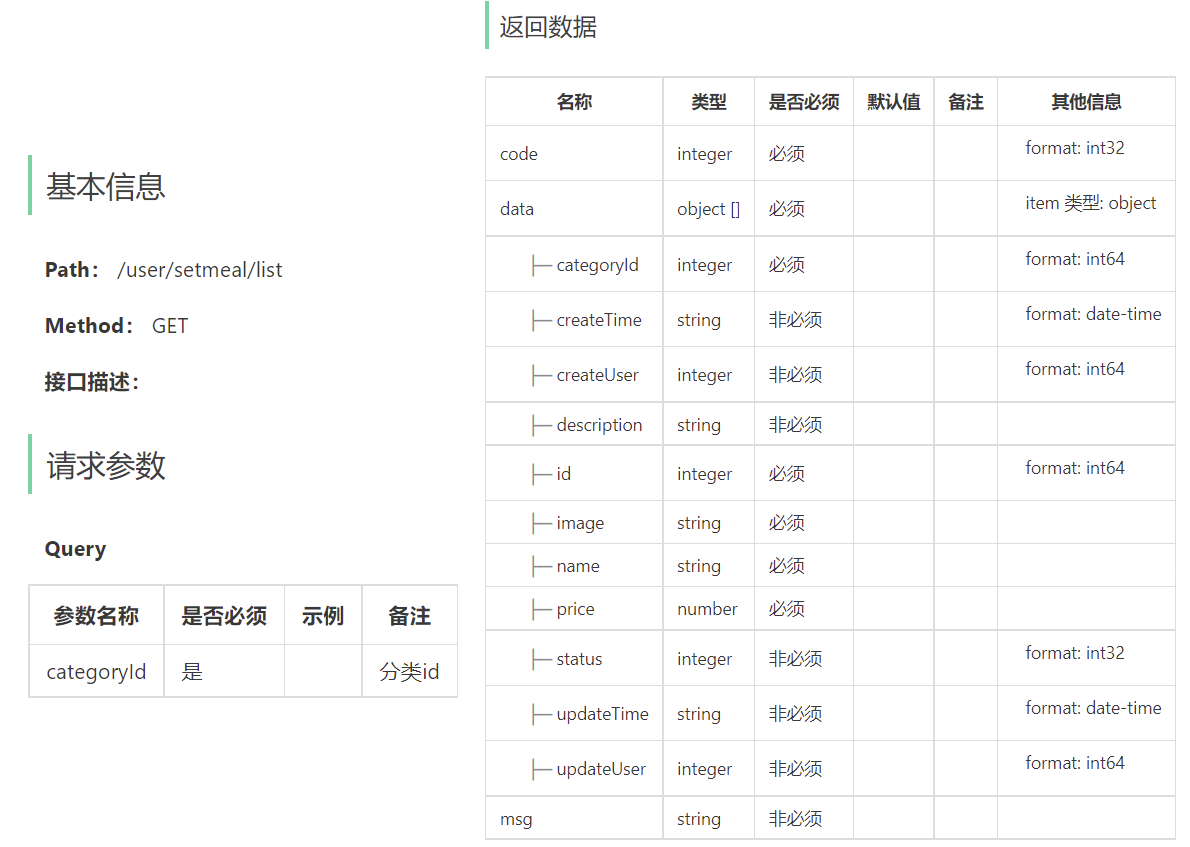
4). 根据套餐id查询包含的菜品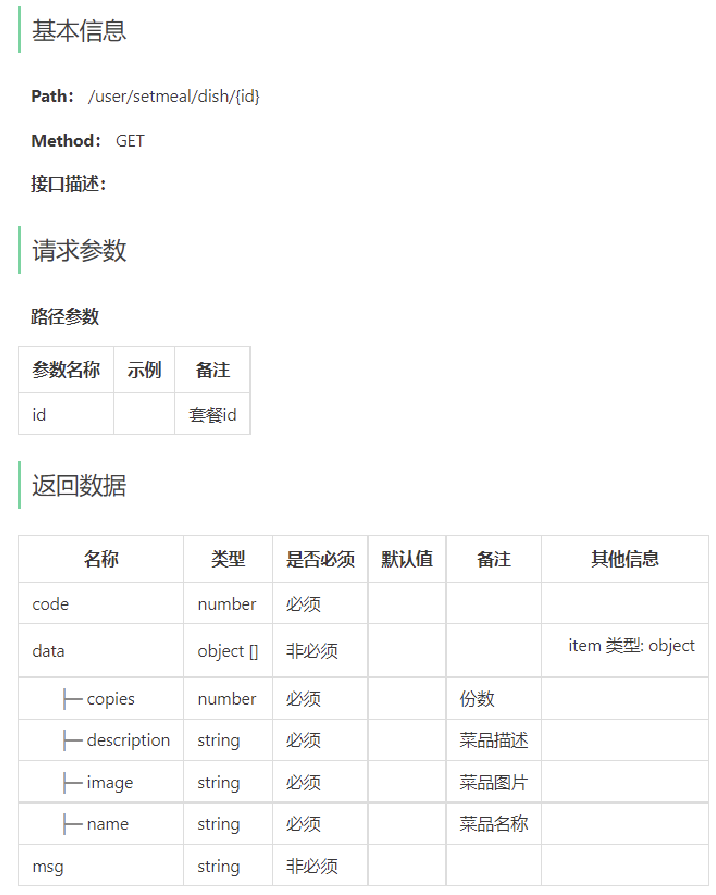
代码导入
导入资料中的商品浏览功能代码即可可按照mapper–>service–>controller依次导入,这样代码不会显示相应的报错。
功能测试
菜品和套餐分类查询: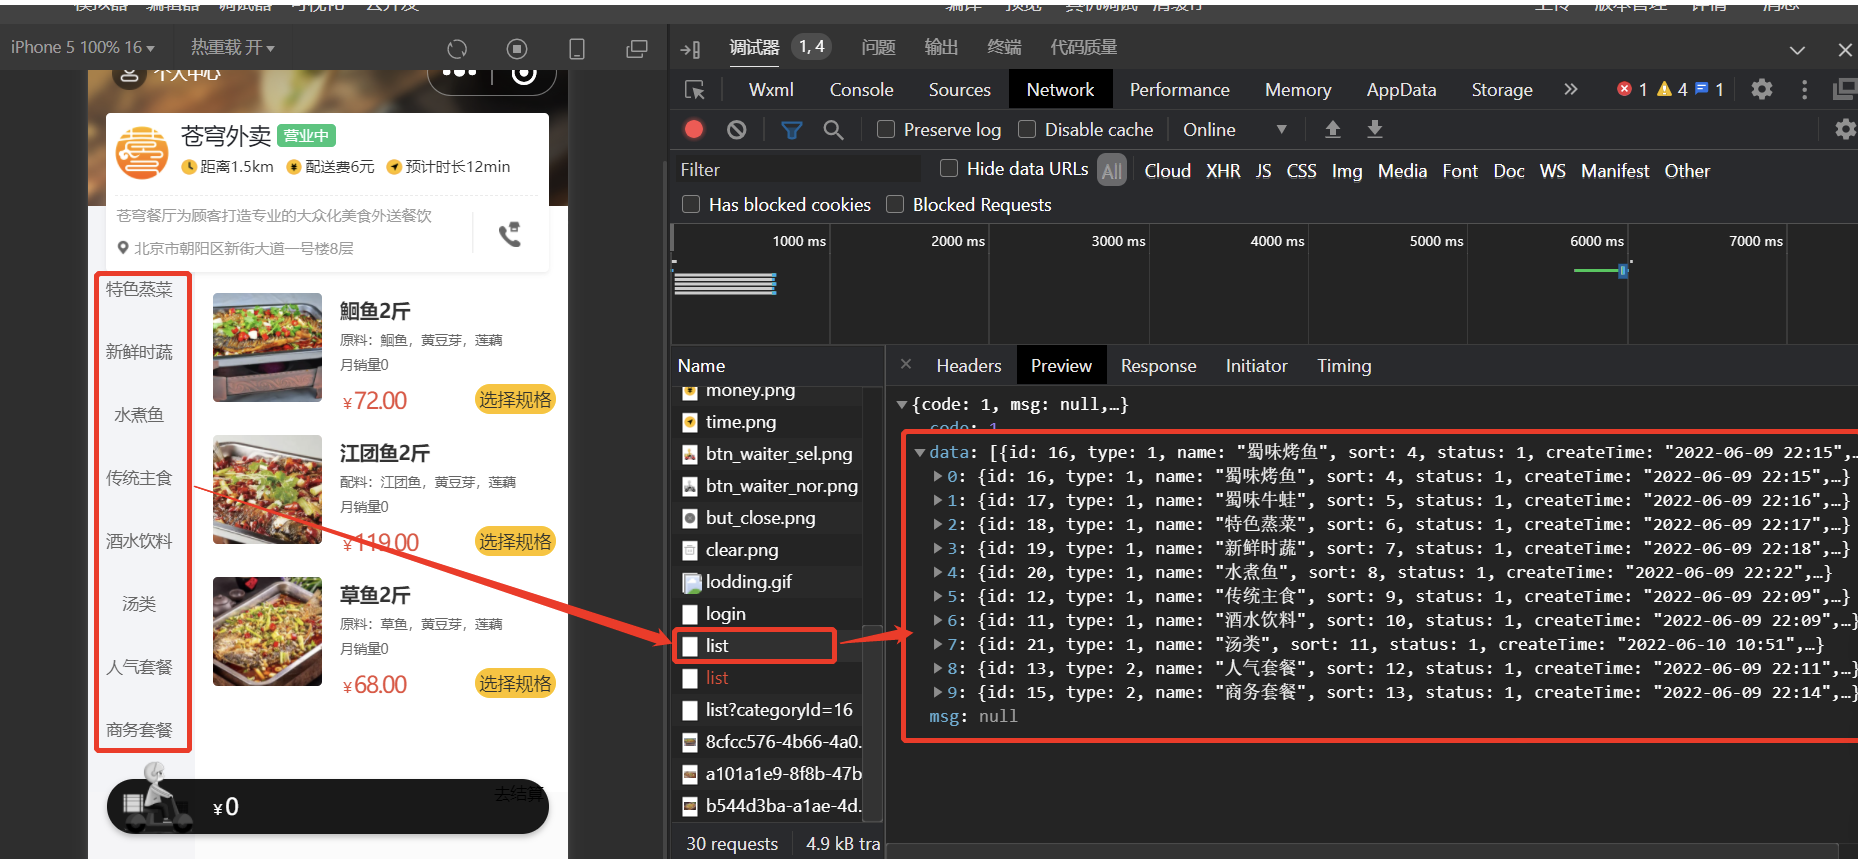
具体分类下的菜品查询: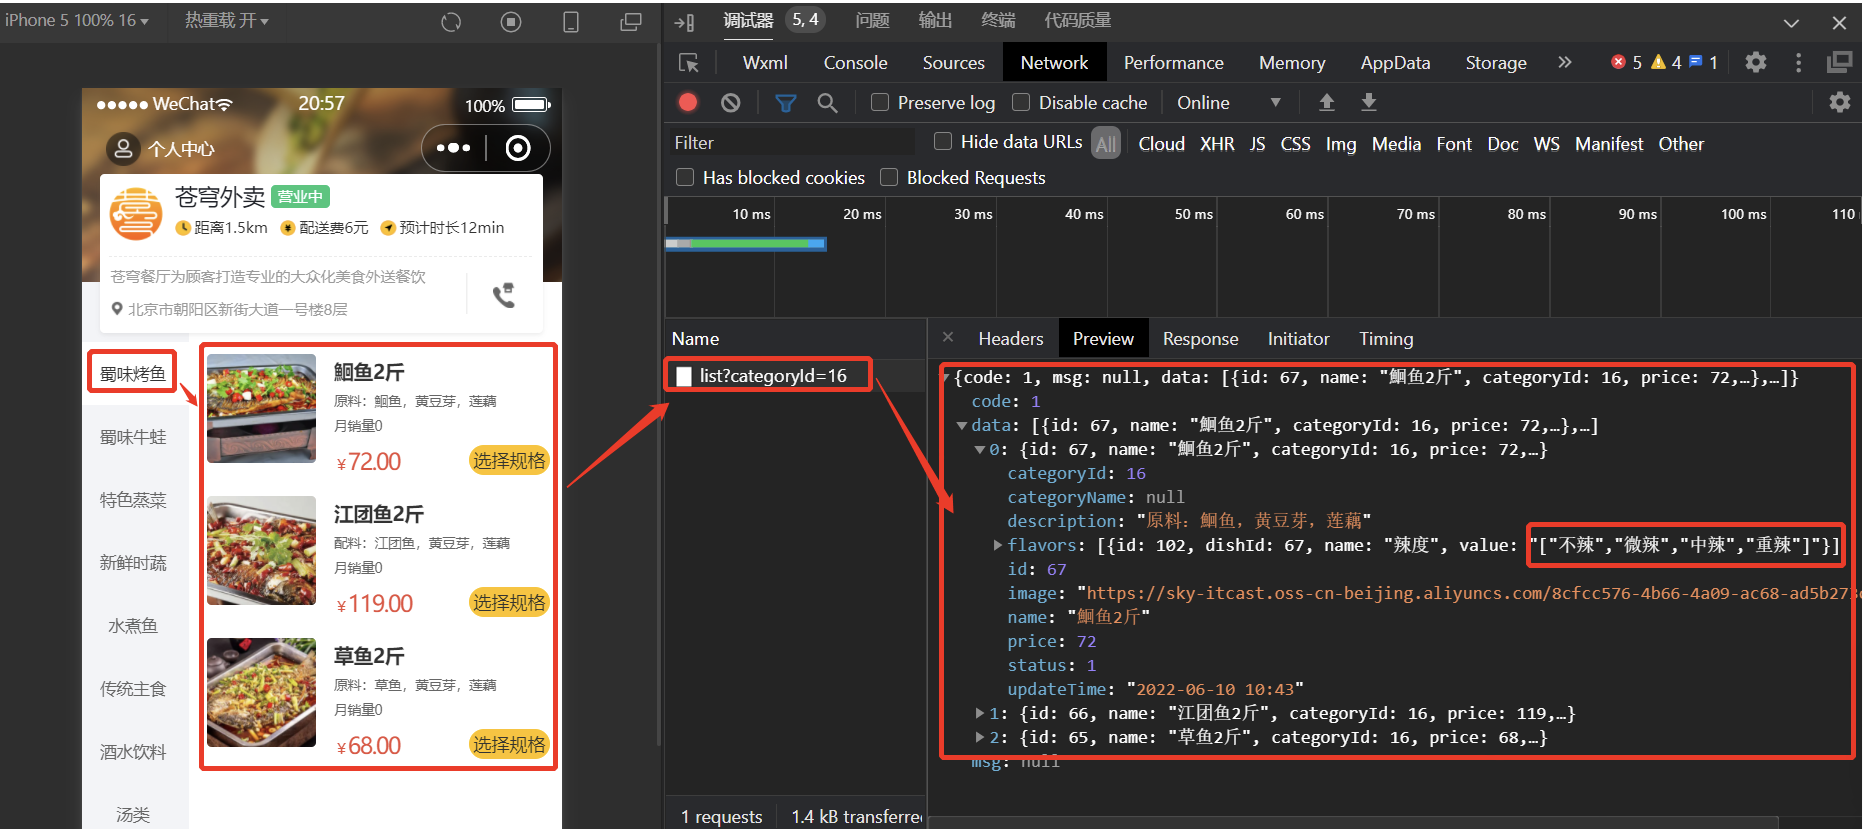
菜品口味查询: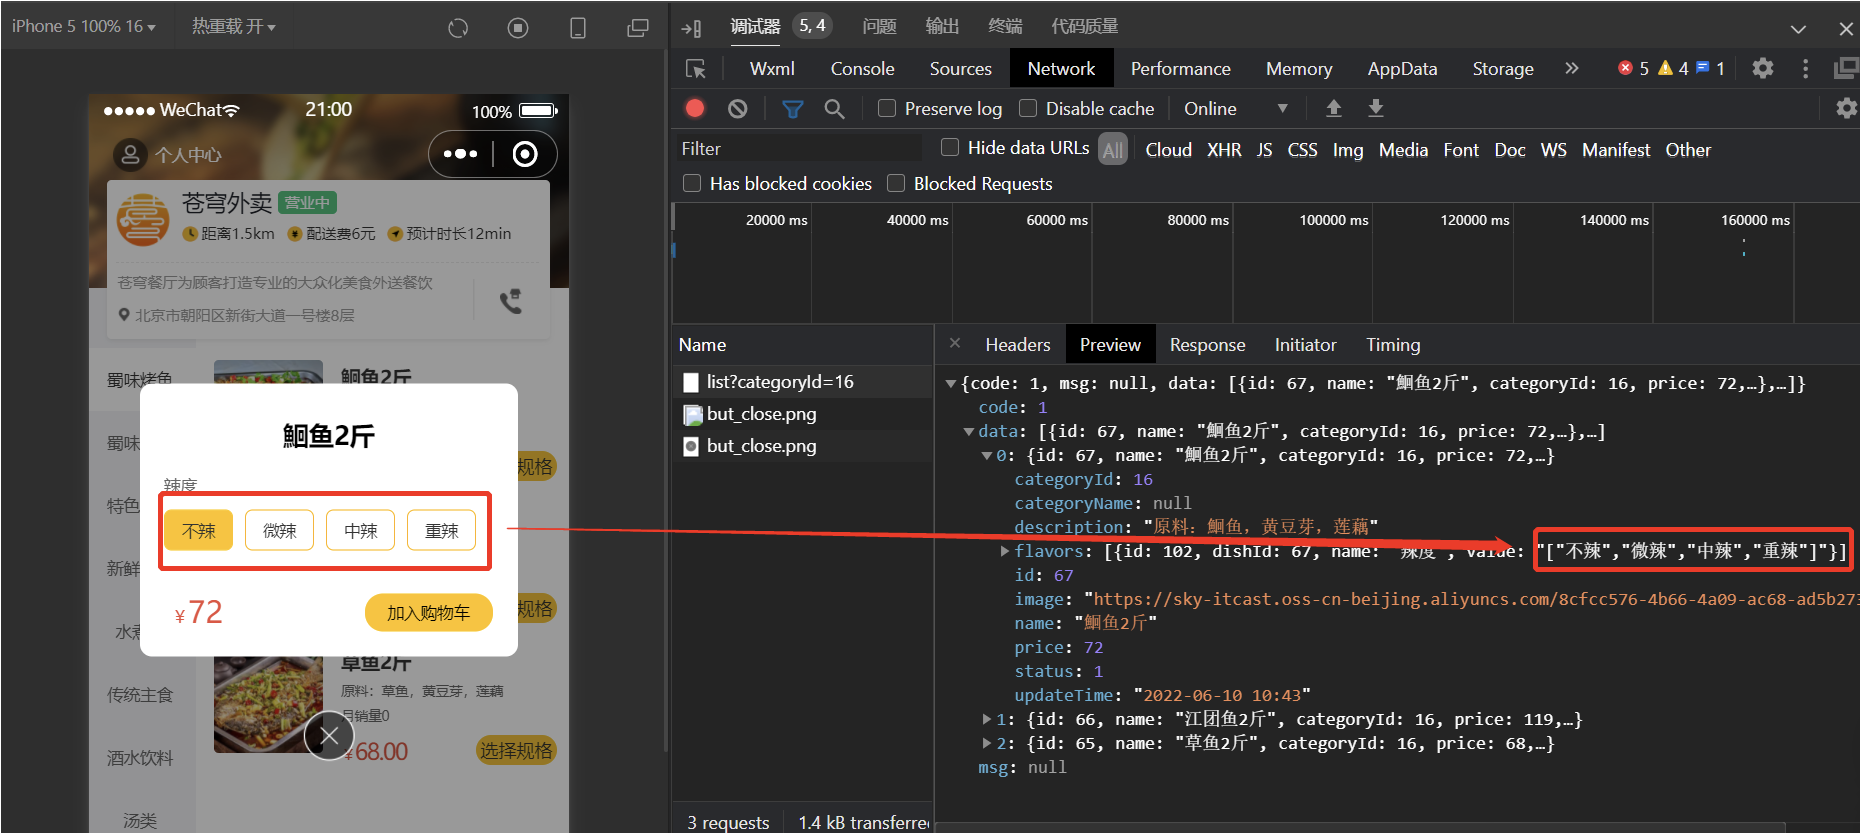
附:其他盲区知识补充
Service注解与Mapper注解
在 MyBatis 框架中,@Mapper注解之所以加在Mapper 接口上,是由其动态代理的实现机制决定的,具体可从以下几点分析:
1. MyBatis 的 “接口 - 代理” 设计逻辑
MyBatis 采用 “接口 + 动态代理” 的方式工作:
- 我们定义的
Mapper接口仅声明 SQL 操作的方法签名(如List<User> selectAll())。 - MyBatis 在运行时,会通过动态代理技术,为每个标注
@Mapper的接口自动生成实现类(代理类)。这个代理类会负责解析 XML 映射文件(或注解式 SQL)、执行 SQL、处理结果映射等核心操作。
因此,@Mapper注解加在接口上,是为了告诉 MyBatis:“需要为这个接口生成代理实现类,以便执行 SQL 操作”。
2. 与@Service的本质区别
@Service是 Spring 的注解,用于标记具体的服务实现类,目的是让 Spring IoC 容器识别并管理其对象实例(创建对象、依赖注入等)。而@Mapper是 MyBatis 的注解,用于标记需要生成代理的接口,目的是让 MyBatis 为接口动态生成 “能执行 SQL 的实现类”。
简单来说:
@Service针对具体类,由 Spring 直接管理实例;@Mapper针对接口,由 MyBatis 通过动态代理生成实现类。
补充:简化配置的@MapperScan
为了避免在每个 Mapper 接口上重复加@Mapper,还可以在 Spring Boot 的配置类上使用@MapperScan注解,指定 Mapper 接口的扫描包路径,例如:
@SpringBootApplication
@MapperScan("com.example.mapper") // 扫描该包下的所有Mapper接口
public class Application {
    public static void main(String[] args) {
        SpringApplication.run(Application.class, args);
    }
}综上,@Mapper加在接口上是 MyBatis“接口 + 动态代理” 设计的必然结果,和@Service的使用场景、框架机制存在本质差异。